Wiring garage door sensors is essential for ensuring the safe and efficient operation of your garage door system. These sensors are critical in detecting obstacles or obstructions in the path of your garage door, preventing potential accidents and damage to vehicles, property, or individuals. Understanding how to correctly wire garage door sensors is paramount for maintaining the functionality and safety of your garage door opener. This comprehensive guide provides detailed steps and insights into the wiring process, empowering you with the knowledge necessary to install and troubleshoot garage door sensors effectively.
The guide covers essential aspects such as understanding the wiring diagram, identifying components, and addressing common issues that may arise during installation or operation. By following these guidelines, you can ensure that your garage door sensors are installed correctly, allowing them to operate reliably and accurately detect any obstacles in the door’s path. Whether you are installing new sensors or conducting maintenance on existing ones, adhering to proper wiring practices will enhance the overall safety and security of your garage, providing peace of mind for you and your family.
Garage Door Sensor Wiring Diagram Sections You Should Know
When wiring garage door sensors, familiarity with the wiring diagram sections is crucial for ensuring accurate installation and optimal functionality. The diagram typically delineates sections for power supply connections, sensor units, and links to the garage door opener. Each section is distinctly labeled and color-coded, facilitating easy identification and seamless wiring. Understanding these sections ensures that all components are correctly integrated, enabling the sensors to effectively communicate with the garage door opener.
What is a Garage Door Sensor?
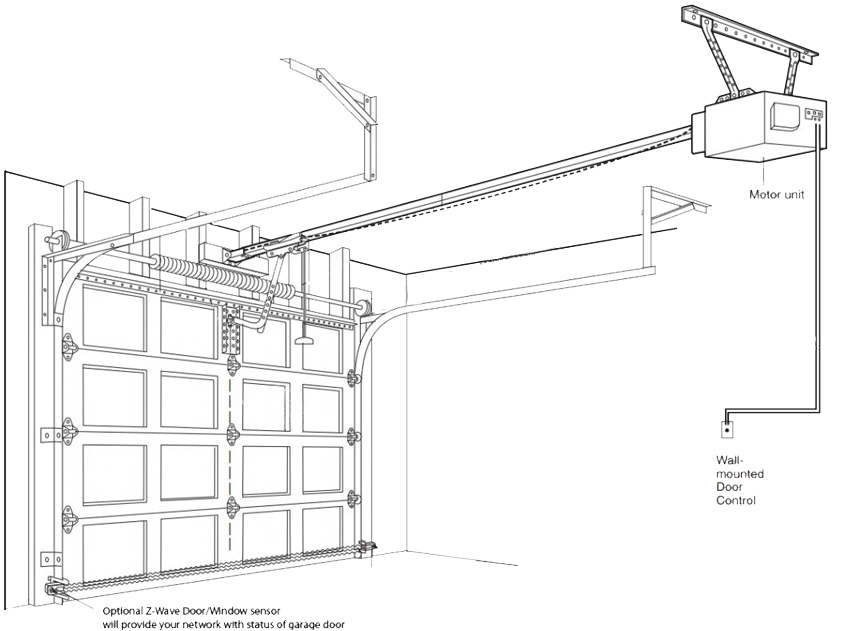
A garage door sensor, also known as a safety sensor or photoelectric sensor, comprises a pair of devices strategically positioned on either side of the garage door opening. These sensors emit an imperceptible beam of infrared light. Should this beam be interrupted while the door is in the process of closing, the sensors promptly relay a signal to the garage door opener. This signal triggers an immediate halt and reversal of the door’s movement, thereby preventing potential collisions with objects or individuals.
The Importance of a Garage Door Sensor
Garage door sensors are essential for improving safety, especially in homes with kids or pets. They serve as an additional safeguard by swiftly detecting any obstructions obstructing the path of the closing garage door. By preemptively stopping the door’s operation, they mitigate the risk of accidents and minimize potential property damage.
Understanding the Basic Wiring Diagram
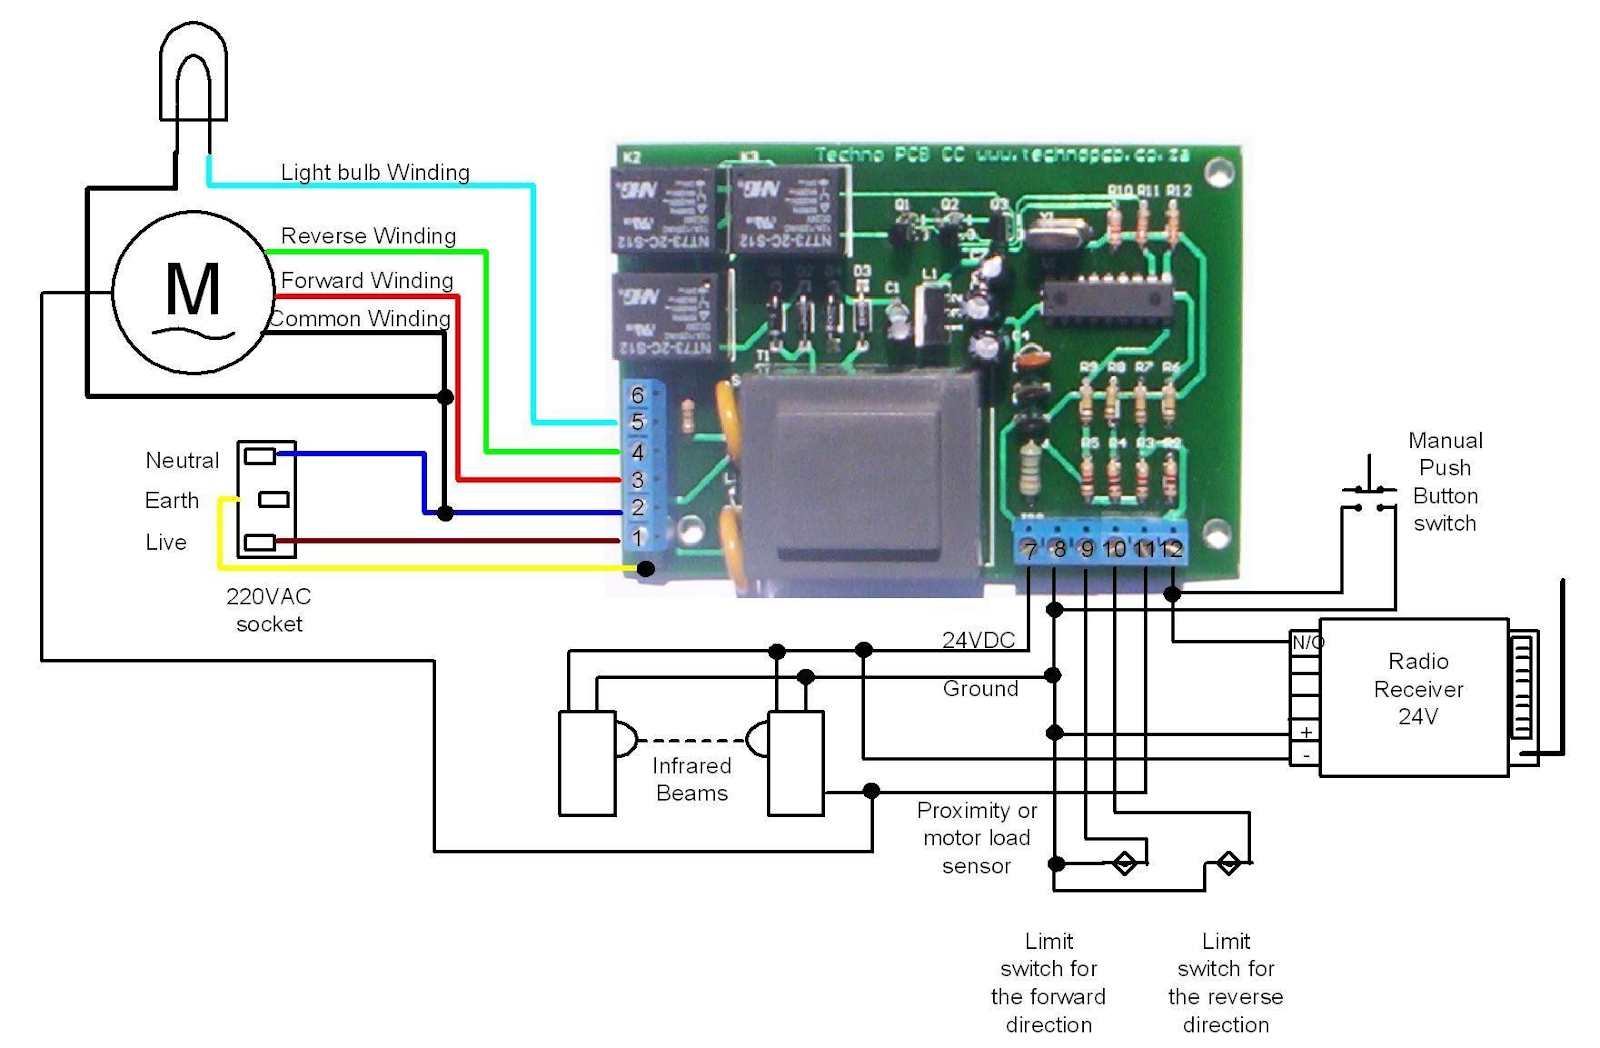
The fundamental wiring diagram for garage door sensors includes crucial connections such as those for the power supply, ground, and the sensor units themselves. This diagram offers a clear depiction of how these components should be properly interconnected to ensure seamless communication between the sensors and the garage door opener. By adhering to the wiring diagram, installers can ensure that all necessary electrical connections are established correctly, optimizing the sensors’ performance.
A typical garage door sensor consists of several key components that work together to ensure the safe and reliable operation of the garage door opener system:
- Transmitter: This component emits an infrared beam across the garage door opening. It is usually housed in one sensor unit and sends out the beam towards the receiver unit.
- Receiver: Located in the opposite sensor unit, the receiver detects the infrared beam emitted by the transmitter. If this beam is interrupted by an object or obstruction, the receiver sends a signal to the garage door opener to halt or reverse the door’s movement.
- Photoelectric Cells: These cells are integral to the transmitter and receiver units. They convert light into electrical signals, facilitating the detection and transmission of the infrared beam.
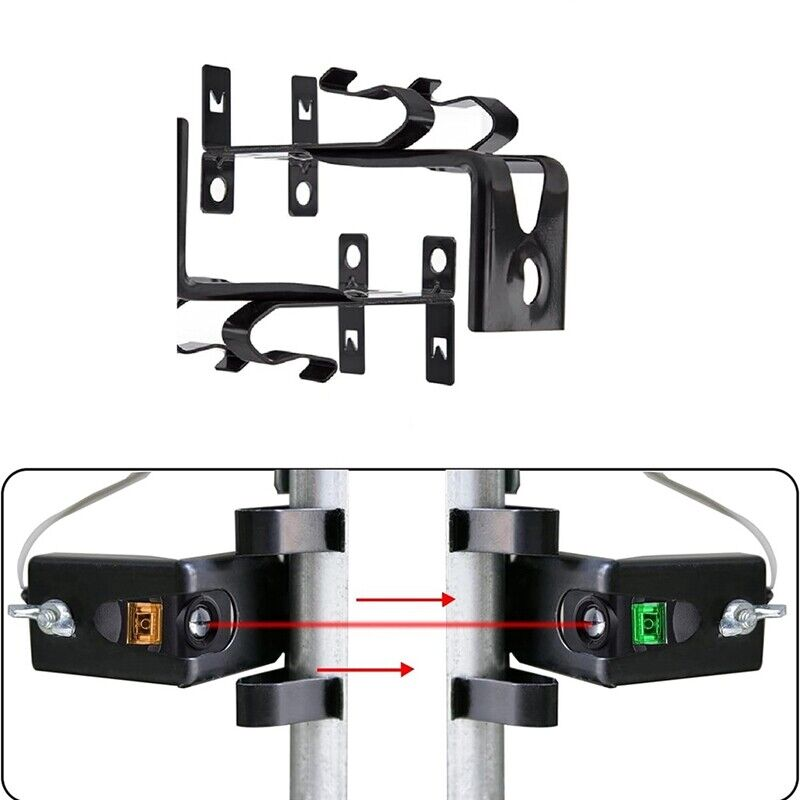
- Indicator Lights: Many garage door sensors are equipped with indicator lights that provide visual feedback on their operational status. These lights can indicate whether the sensors are aligned properly and functioning correctly.
- Mounting Brackets: These brackets securely attach the sensor units to the garage door frame or wall, ensuring they remain in position to accurately detect obstacles in the door’s path.
- Wiring and Terminals: Garage door sensors include wiring and terminals that connect them to the garage door opener unit. Proper wiring ensures the sensors communicate effectively with the opener, enabling safety features like automatic reversal upon obstruction detection.
Components of a Garage Door Sensor
A standard garage door sensor consists primarily of two essential components: the transmitter and the receiver. The transmitter is responsible for emitting the infrared beam, while the receiver detects any interruptions in this beam. Together, these components collaborate to facilitate the safe and efficient operation of the garage door opener. Proper alignment and installation of these components are critical to ensuring the sensors function as intended, thereby upholding the safety protocols of the garage door system.
Steps on Wiring the Garage Door Sensor to the Opener
Installing garage door sensors and wiring them correctly to the opener unit is crucial for ensuring the safe and efficient operation of your garage door system. Proper installation not only enhances safety by enabling features like automatic door reversal upon obstruction detection but also contributes to the overall reliability of the system. This guide outlines the systematic steps to wire garage door sensors to the opener unit effectively, following manufacturer guidelines to ensure optimal functionality.
1. Identify Manufacturer’s Specifications
Begin by carefully reviewing the manufacturer’s specifications and wiring diagram provided with your garage door opener. These documents typically outline specific terminals on the opener unit where the sensor wires should be connected. Understanding these details ensures a clear plan for the wiring process.
2. Prepare Sensor Wires
Strip the insulation from the ends of the sensor wires to expose the conductors. This step allows for a secure and reliable connection to the designated terminals on the garage door opener unit. Proper preparation ensures that the wires can transmit signals effectively between the sensors and the opener.
3. Connect Wires to Designated Terminals
Insert each prepared sensor wire into its corresponding terminal on the garage door opener unit. Ensure that each wire is inserted securely and tightened using the terminal screws provided. This step is crucial to establish stable electrical connections that facilitate proper communication between the sensors and the opener.
4. Route Wires Safely
Carefully route the sensor wires along the designated path, following any channels or clips provided on the garage door opener or frame. This helps protect the wires from damage and prevents them from interfering with the door’s movement during operation.
5. Conduct Thorough Inspection
After completing the wiring, conduct a comprehensive inspection of the connections. Check for any exposed wires, loose terminals, or signs of damage that could compromise the sensors’ functionality or pose electrical hazards. Handle any problems right away to guarantee safe operation.
6. Test Sensor Functionality
Activate the garage door to test the functionality of the sensors. Observe how they detect obstacles in the door’s path and verify that they trigger the automatic reversal feature if an obstruction is present. Testing ensures that the sensors are installed correctly and functioning as intended to enhance the safety and reliability of the entire garage door system.
Common Issues with Garage Door Sensor Wiring
Common Issues with Garage Door Sensor Wiring can manifest in various ways that impact the safety and functionality of your garage door opener system:
- Loose or Disconnected Wires: Ensure all wires are securely connected to their respective terminals on both the sensors and the opener unit. Loose connections can lead to intermittent operation or complete failure of the sensors to transmit signals.
- Damaged Wires: Inspect the sensor wires for signs of damage such as cuts, fraying, or exposure. Damaged wires can compromise the sensor’s ability to accurately transmit the infrared beam, resulting in unreliable detection of obstacles.
- Incorrect Wiring Connections: Consult the wiring diagram and installation manual to verify that wires are correctly connected to their designated terminals on both ends. Incorrect wiring connections can prevent the sensors from functioning properly and communicating effectively with the garage door opener.
- Faulty Sensor Units: If the sensors consistently fail to detect obstacles or if their indicator lights do not align properly, the units may be faulty. Internal faults or misalignment issues can necessitate replacing the sensor units to restore proper functionality and safety.
- Environmental Factors: External factors such as direct sunlight, rain, or physical obstructions blocking the sensor’s line of sight can also affect sensor performance. Ensure sensors are installed in a location where they are protected from such environmental elements.
Frequently Asked Questions (FAQs)
How do garage door sensors work?
Garage door sensors work by emitting an invisible beam of infrared light between the transmitter and receiver units installed on opposite sides of the garage door opening. When the beam is interrupted by an object, the sensors signal the garage door opener to stop and reverse its operation, preventing the door from closing on obstructions.
What should I do if my garage door closes partway and then reverses?
If your garage door closes partway and then reverses, it may indicate an issue with the sensors. Check for any obstructions blocking the sensor beams or clean the sensor lenses to ensure they are free from dust or debris. Adjust the alignment of the sensors so that they are facing each other directly and their indicator lights are aligned and solid.
Can I bypass garage door sensors?
Bypassing garage door sensors is not recommended as it compromises the safety features of your garage door opener. Sensors are designed to prevent the door from closing on objects or people, reducing the risk of accidents or injuries. If you need to temporarily bypass the sensors for testing purposes, consult the manufacturer’s guidelines and follow proper safety precautions.
Why are my garage door sensors blinking?
If your garage door sensors are blinking, it typically indicates an issue with alignment or an obstruction blocking the sensor beam. Check for any objects, dirt, or debris blocking the sensor lenses and clean them if necessary. Ensure the sensors are properly aligned and facing each other directly. Solid indicator lights on both sensors indicate proper alignment and functionality.
How often should my garage door sensors be tested?
It is recommended to test your garage door sensors monthly to ensure they are functioning correctly. Perform a visual inspection to verify that the indicator lights on both sensors are solid and not blinking. Test the sensors by placing an object in the path of the closing door to see if it reverses as expected. Regular testing helps maintain the safety and reliability of your garage door opener system.
Conclusion
Wiring garage door sensors is crucial for ensuring the safety and efficiency of your garage door opener system. Understanding the wiring diagram sections, component roles, and common issues allows for proper installation and effective troubleshooting.
Regular maintenance and inspection of sensor wiring are vital practices to prevent potential problems. Periodically check sensor wires for wear, damage, or loose connections. Keep sensor lenses clean to ensure the clear transmission of the infrared beam between transmitter and receiver units. Testing sensors regularly by activating the garage door confirms their functionality and alignment.
If persistent issues with sensor wiring arise, consult the manufacturer’s installation manual and troubleshooting guide for specific instructions. Following their recommendations or seeking professional help promptly resolves issues, maintaining your garage door opener system’s safety features. These proactive measures ensure reliable operation and bolster the overall security of your garage.